WordPress网站Nginx环境开启fastcgi_cache图文教程
很多使用Nginx的小伙伴都听说过fastcgi_cache,fastcgi_cache其实就是服务器缓存,相…

很多使用Nginx的小伙伴都听说过fastcgi_cache,fastcgi_cache其实就是服务器缓存,相比各位WordPress缓存插件来说,省去了从数据库获取资源的时间,但是如何安装fastcgi_cache呢?Nginx版本从0.7.48开始,支持了类似Squid的缓存功能。这个缓存是把URL及相关组合当做Key,用Md5算法对Key进行哈希,得到硬盘上对应的哈希目录路径,从而将缓存内容保存在该目录内。这里搬主题就分享一下WordPress网站Nginx环境开启fastcgi_cache图文教程。
一、部署WordPress程序
基础环境中Nginx Web 缓存服务只能为指定URL或状态码设置过期时间,不支持类似Squid的PURGE指令手动清除缓存;但是我们可以通过Nginx的模块ngx_cache_purge清除指定URL的缓存。
这里搬主题演示环境使用的是BT宝塔面板。
什么?还没安装免费BT宝塔面板?点击进行下载安装
宝塔服务器面板,一键全能部署及管理,送你3188元礼包,点我领取
fastcgi_cache:缓存fastcgi生成的内容,很多情况是PHP生成的动态的内容,少了Nginx与php的通信的次数,更减轻了PHP和数据库(MySQL)的压力,这比用Memcached之类的缓存要轻松得多
环境:
Nginx1.22
PHP7.4
WordPress 6.0.1
部署过程此处省略,使用ab命令进行压测访问。
1.1 Ubuntu安装ab命令:
apt-get install apache2-utils
1.2 Centos安装ab命令:
yum -y install httpd-tools
1.3 ab命令压测
ab -n 100 -c 10 http://192.168.66.172/
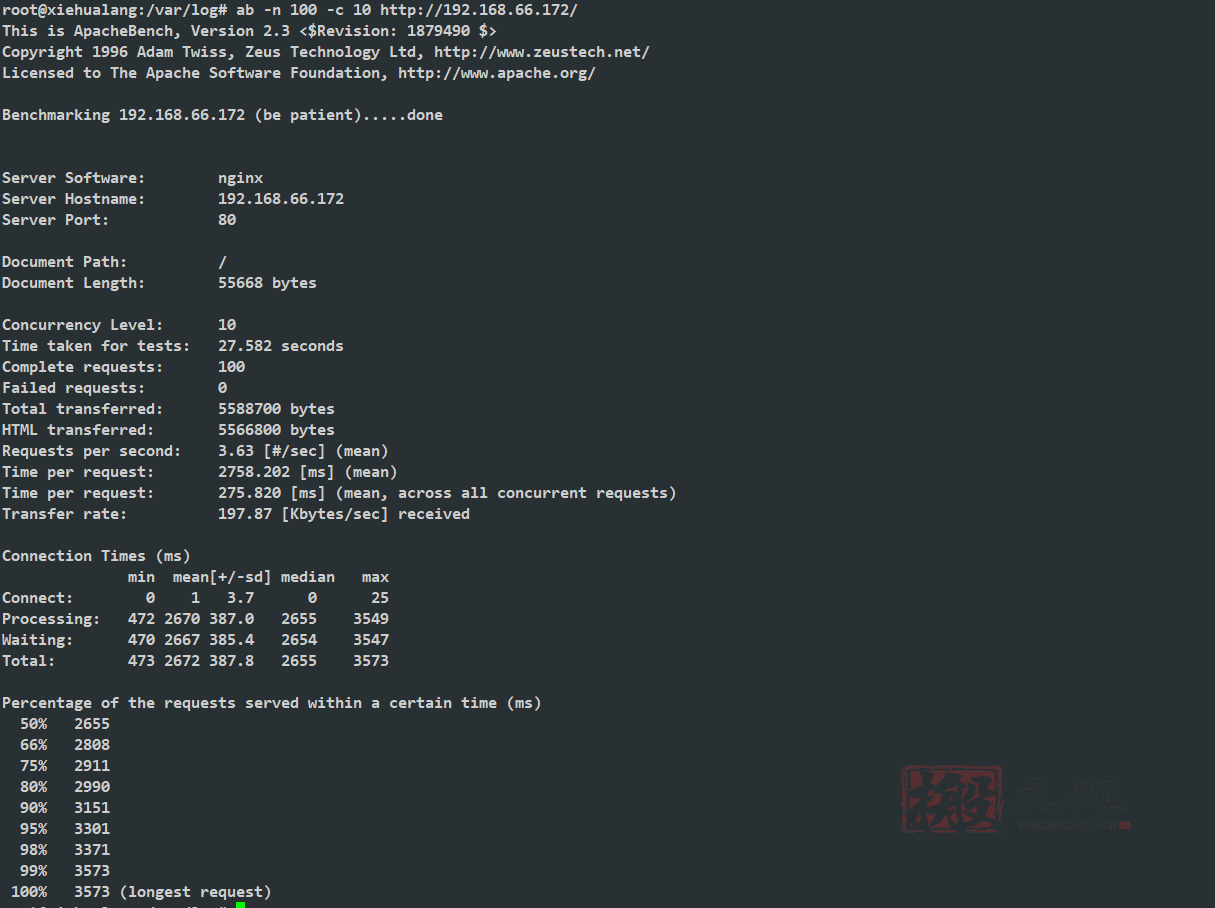
-n:100次请求-c:10个并发请求压力测试
Document Length: 55668 bytes #请求的页面大小
二、FastCGI缓存配置
1.1 编辑对应网站配置文件,添加对应参数
fastcgi_cache_key "$scheme$request_method$host$request_uri";
fastcgi_cache_path /dev/shm/fastcgi-cache levels=1:2 keys_zone=WORDPRESS:100m inactive=60m;
fastcgi_cache_use_stale error timeout invalid_header http_500;
fastcgi_ignore_headers Cache-Control Expires Set-Cookie;
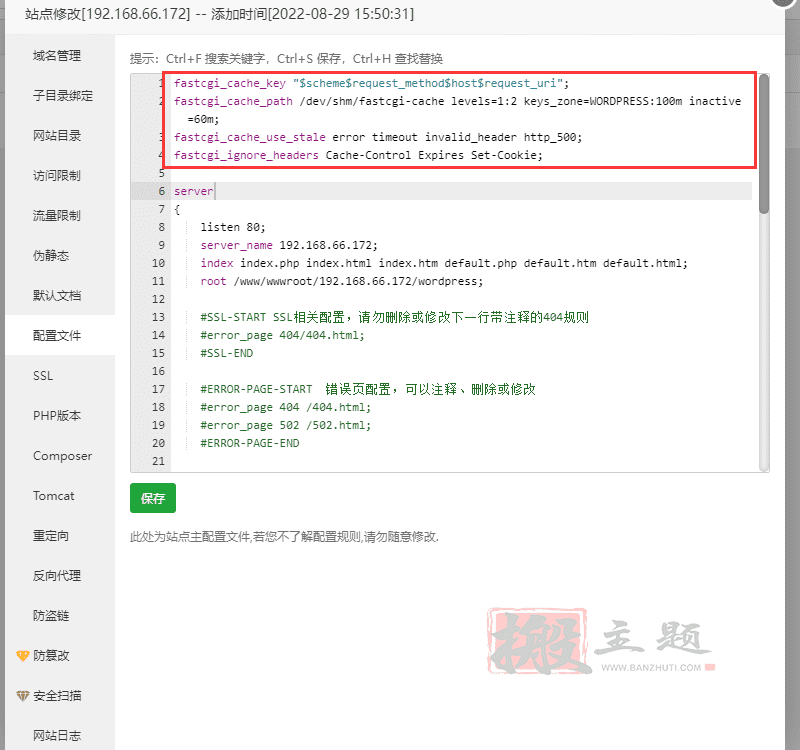
部分参数详解:
1.1.1 fastcgi_cache_path:
指令指定缓存(/dev/shm/fastcgi-cache)的位置,其大小(100m)。内存区域名称(WORDPRESS),子目录级别和非活动定时器。位置可以在硬盘上的任何地方; 但是,大小必须小于您的服务器的RAM +交换,否则你会收到一个错误,“无法分配内存”。 如果缓存在“inactive”选项指定的特定时间内没有被访问(这里为60分钟),Nginx将删除它
1.1.2 fastcgi_cache_key:
指令指定如何哈希缓存文件名。 Nginx基于此指令使用MD5加密访问的文件。
1.1.3 fastcgi_cache_use_stale:
定义哪些情况下用过期缓存
1.1.4 fastcgi_ignore_headers:
默认情况下fastcgi_cache会忽略有特殊header的请求,并不进行缓存,官网说明。但当我们添加这个参数后,这些限制将不在存在。
1.2 创建缓存目录,并将网站内引用的PHP配置注释。
mkdir /dev/shm/fastcgi-cache -p
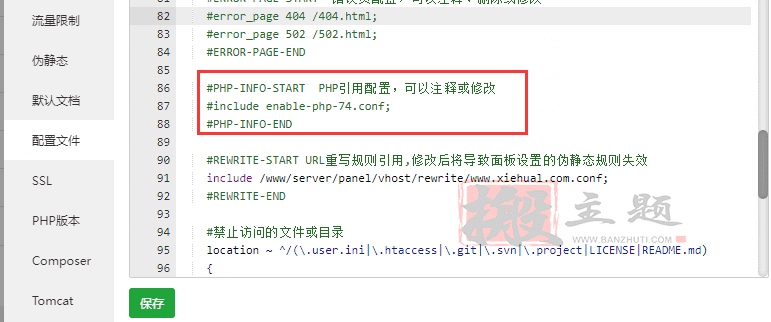
1.3 将下面参数内容添加到server字段内,如果开了SSL的话,添加到#SSL-END下面
set $skip_cache 0;
        if ($request_method = POST) {
            set $skip_cache 1;
        }
        if ($query_string != "") {
            set $skip_cache 1;
        }
        if ($request_uri ~* "/wp-admin/|/xmlrpc.php|wp-.*.php|/feed/|index.php|sitemap(_index)?.xml") {
            set $skip_cache 1;
        }
       if ($http_cookie ~* "comment_author|wordpress_[a-f0-9]+|wp-postpass|wordpress_no_cache|wordpress_logged_in") {
            set $skip_cache 1;
        }
       location ~ [^/].php(/|$)
            {
                try_files $uri =404;
                fastcgi_pass unix:/tmp/php-cgi-74.sock;
                fastcgi_index index.php;
                include fastcgi.conf;
                add_header Strict-Transport-Security "max-age=63072000; includeSubdomains; preload";
                fastcgi_cache_bypass $skip_cache;
                fastcgi_no_cache $skip_cache;
                add_header X-Cache "$upstream_cache_status From $host";
                fastcgi_cache WORDPRESS;
                add_header Cache-Control  max-age=0;
                add_header Nginx-Cache "$upstream_cache_status";
                add_header Last-Modified $date_gmt;
                add_header X-Frame-Options SAMEORIGIN;
                add_header X-Content-Type-Options nosniff;
                add_header X-XSS-Protection "1; mode=block";
                etag  on;
                fastcgi_cache_valid 200 301 302 1d;
        }

      location ~ /purge(/.*) {
            allow 127.0.0.1;
            allow xxx.xxx.xxx.xxx;    #更换服务器本机IP
            deny all;
            fastcgi_cache_purge WORDPRESS "$scheme$request_method$host$1";
        }

        location ~* ^.+.(ogg|ogv|svg|svgz|eot|otf|woff|mp4|ttf|rss|atom|jpg|jpeg|gif|png|ico|zip|tgz|gz|rar|bz2|doc|xls|exe|ppt|tar|mid|midi|wav|bmp|rtf)$ {
        access_log off; log_not_found off; expires max;
    }

    location = /robots.txt { access_log off; log_not_found off; }
    location ~ /. { deny  all; access_log off; log_not_found off; }
PS:以上参数过多,没办法一一解释,可自行查询对应参数了解。
1.4 wp的插件商店内安装 Nginx Helper插件然后配置,需要勾选Enable Purge保存启用。
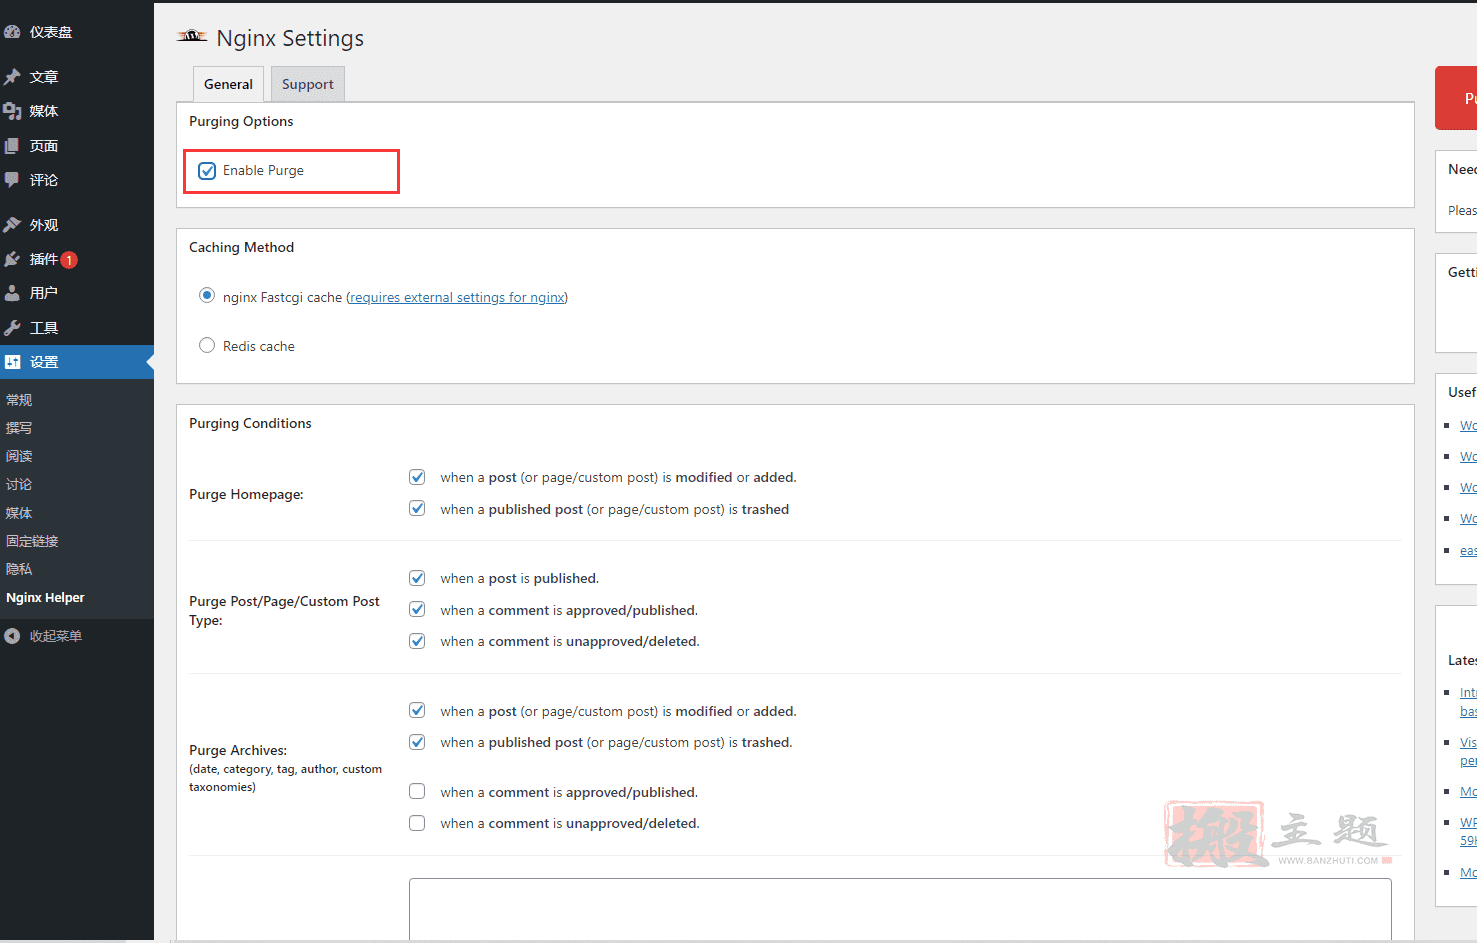
PS:
1.1.1 由于插件作者定义的缓存路径是在/var/run/nginx-cache,根据自己的实际情况修改缓存路径,如果缓存路径不一致会导致插件找不到缓存文件而删除
1.1.2 找到wp程序的wp-config.php配置文件加入下面代码
<div><font color="#111111" face="system-ui"><span style="font-size: 14.6667px;">define('RT_WP_NGINX_HELPER_CACHE_PATH','/dev/shm/nginx-cache');</span></font></div><div></div>
1.5 访问测试是否有无名称缓存
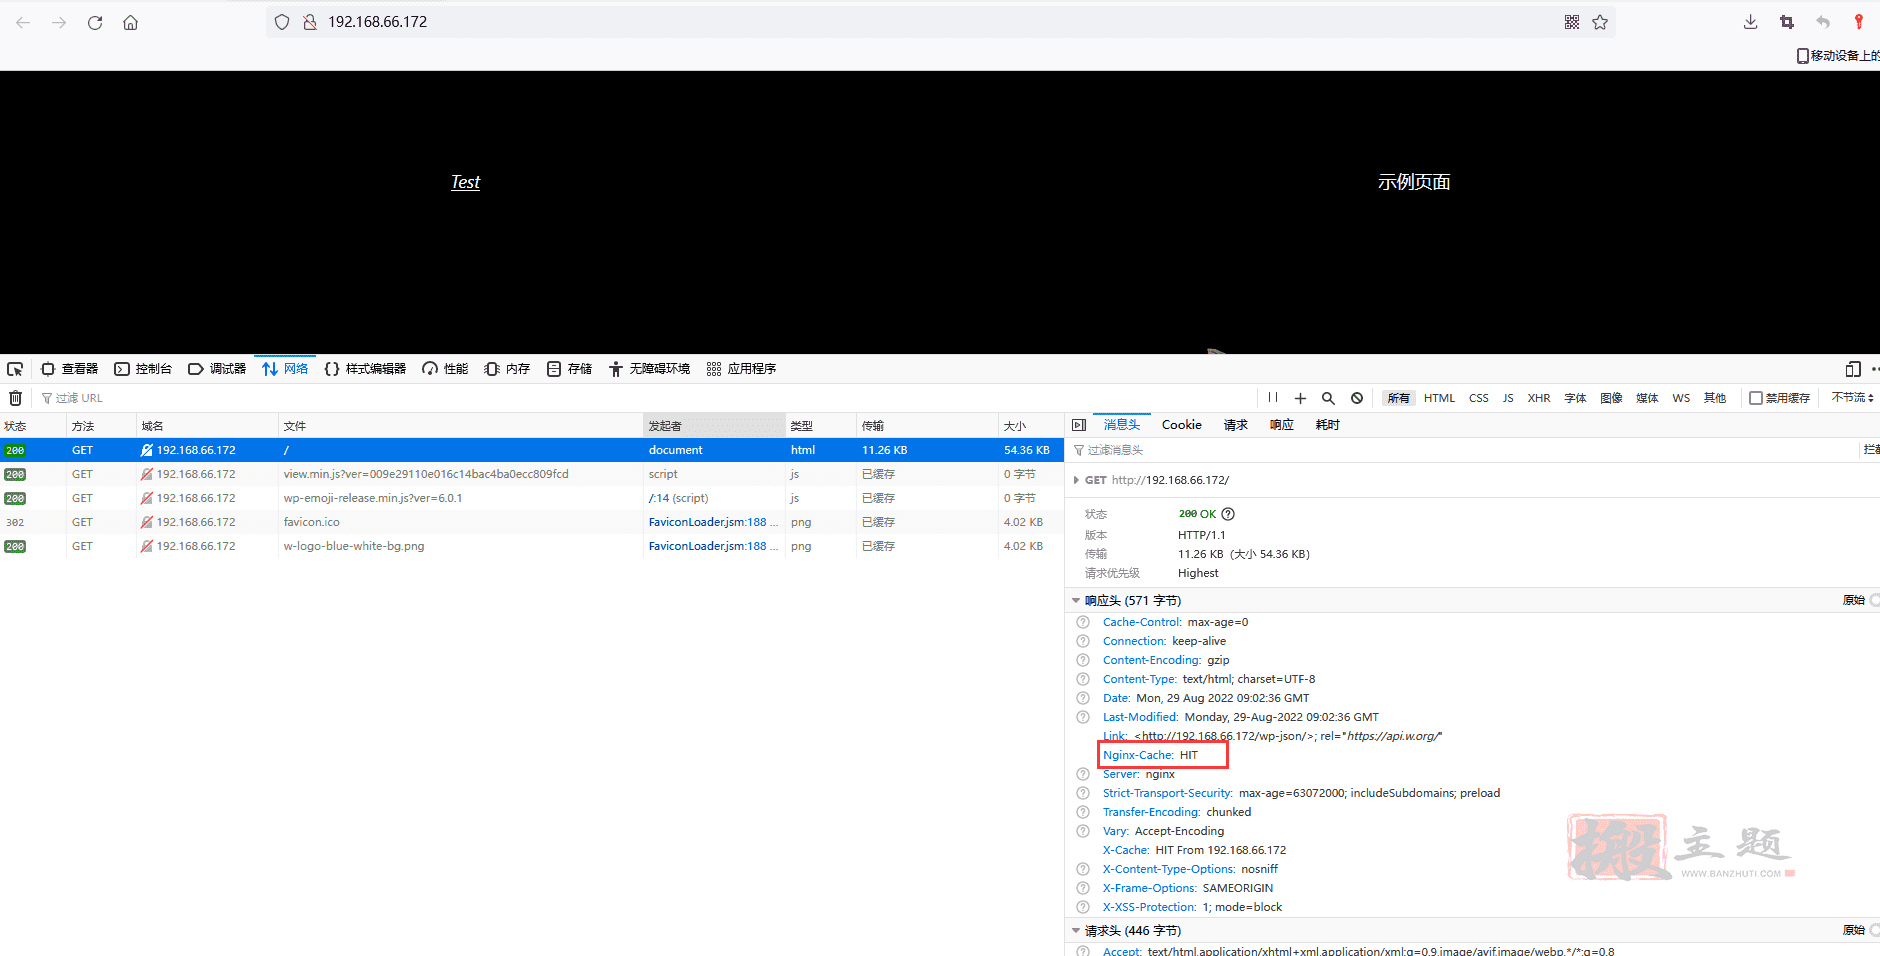
1.6 在使用ab压测命令进行压测查看对比
配置Pastcgi_cache后压测:
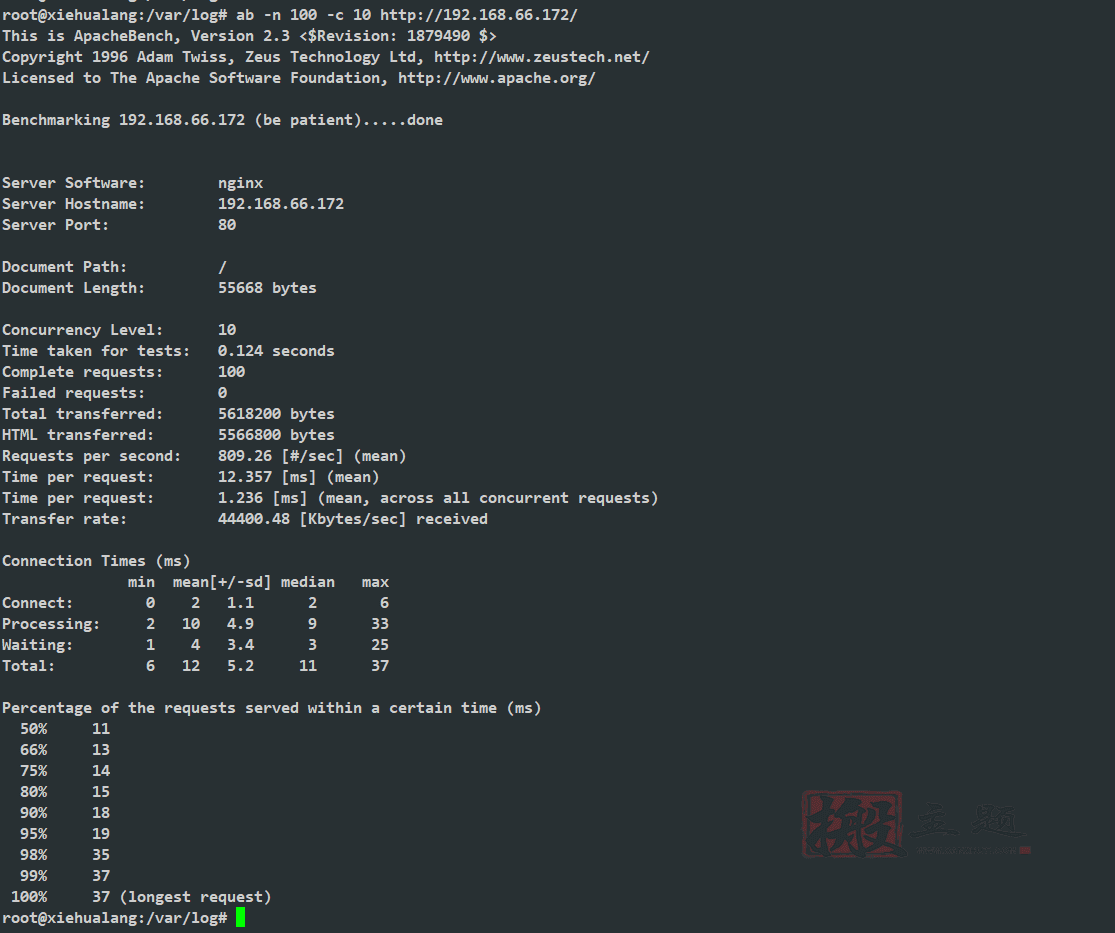
未配置Pastcgi_cache进行压测:
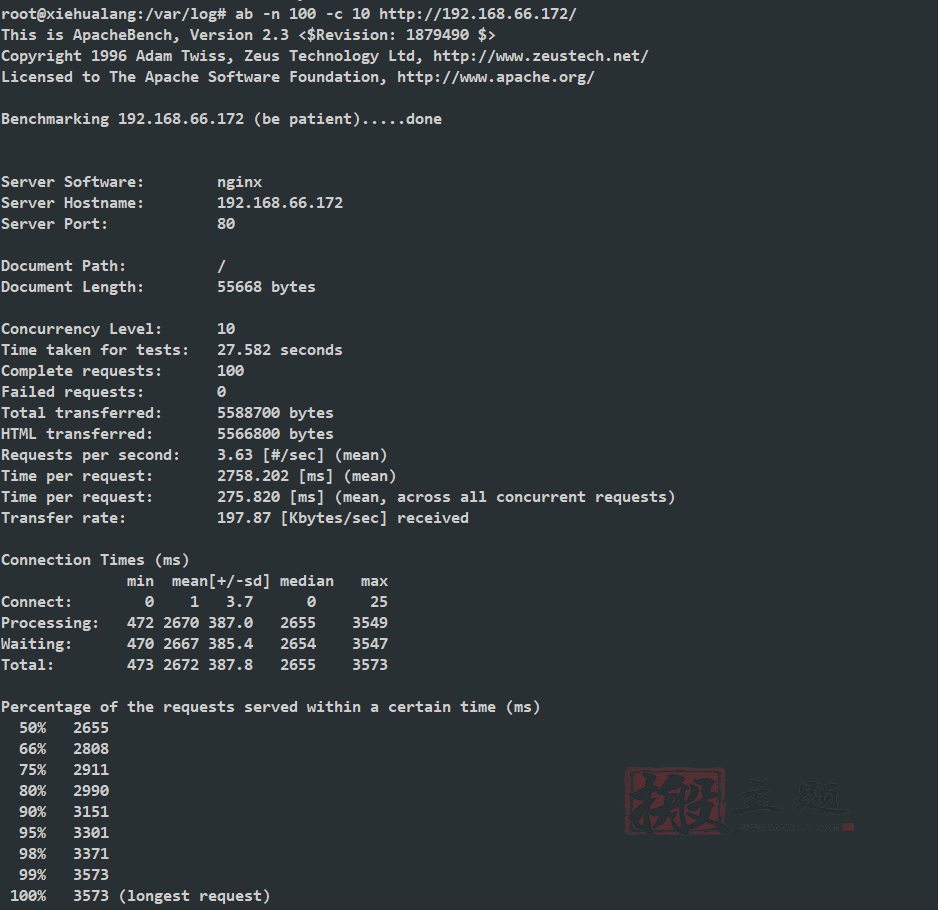
本文收集自互联网,转载请注明来源。
如有侵权,请联系 wper_net@163.com 删除。

还没有任何评论,赶紧来占个楼吧!