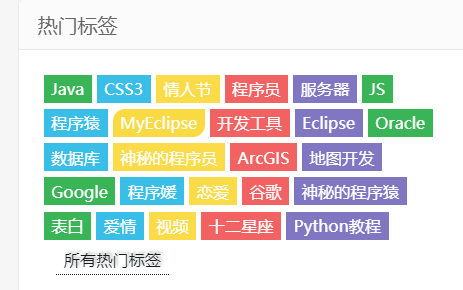
标签云现在是博客和新闻网站的相对常见的网站元素。 使用WordPress构建网站时,也可以使用标签云,但是传统…
标签云现在是博客和新闻网站的相对常见的网站元素。 使用WordPress构建网站时,也可以使用标签云,但是传统的标签云文本是黑色的,看起来很普通,并不那么漂亮。 那么有没有办法改变它呢? 答案是肯定的,我们可以使用彩色标签云功能。下面教你如何做一个彩色标签云widget小工具:

模板主题目录下新建一个colortag-widget.php文件,把下面小工具代码放入colortag-widget.php。
1
2
3
4
5
6
7
8
9
10
11
12
13
14
15
16
17
18
19
20
21
22
23
24
25
26
27
28
29
30
31
32
33
34
35
36
37
38
39
40
41
42
43
|
<?php
class Color_Tag_Widget extends WP_Widget { //继承了 WP_Widget 这个类来创建新的小工具(Widget)
function Color_Tag_Widget ()
{
$widget_ops = array(‘description’ => ‘一个彩色标签云’);
$control_ops = array(‘width’ => 400, ‘height’ => 300);
parent::WP_Widget(false,$name=‘一个彩色标签云’,$widget_ops,$control_ops);
//parent::直接使用父类中的方法
//$name 这个小工具的名称,
//$widget_ops 可以给小工具进行描述等等。
//$control_ops 可以对小工具进行简单的样式定义等等。
}
function form($instance) { // 给小工具(widget) 添加表单内容
$title = esc_attr($instance[‘title’]);
$tagnum = esc_attr($instance[‘tagnum’]);
?>
<p><label for=”<?php echo $this->get_field_id(‘title’); ?>“><?php esc_attr_e(‘Title:’); ?> <input class=”widefat” id=”<?php echo $this->get_field_id(‘title’); ?>” name=”<?php echo $this->get_field_name(‘title’); ?>” type=”text” value=”<?php echo $title; ?>” /></label></p>
<p><label for=”<?php echo $this->get_field_id(‘tagnum’); ?>“><?php esc_attr_e(‘最多显示标签数:’); ?> <input class=”widefat” id=”<?php echo $this->get_field_id(‘tagnum’); ?>” name=”<?php echo $this->get_field_name(‘tagnum’); ?>” type=”text” value=”<?php echo $tagnum; ?>” /></label></p>
<?php
}
function update($new_instance, $old_instance) { // 更新保存
$instance = $old_instance;
$instance[ ‘title’ ] = strip_tags( $new_instance[ ‘title’ ] );
$instance[ ‘tagnum’ ] = strip_tags( $new_instance[ ‘tagnum’ ] );
return $instance;
}
function widget($args, $instance) { // 输出显示在页面上
extract( $args );
$title = apply_filters(‘widget_title’, empty($instance[‘title’]) ? __(‘彩色标签云’) : $instance[‘title’]);
if ( ! $tagnum = absint( $instance[‘tagnum’] ) ) $tagnum = ’16’;//默认放置最多16个标签
?>
<?php echo $before_widget; ?>
<?php if ( $title )
echo $before_title . $title . $after_title; ?>
<div class=”colortags”><?php wp_tag_cloud(‘smallest=12&largest=18&unit=px&number=’.$tagnum.‘&orderby=count&order=DESC’);?></div>
<?php echo $after_widget; ?>
<?php
}
}
register_widget(‘Color_Tag_Widget’);
?>
|
代码注释:
- smallest表示标签的最小字号
- largest表示最大字号
- unit=px表示字体使用像素单位
- number=0表示显示所有标签,如果为40,表示显示40个
- orderby=count表示按照标签所关联的文章数来排列
- order=DESC表示降序排序(ASC表示升序排序,DESC表示降序排序)
之后在functions.php调用colortag-widget.php即可。调用代码如下所示:
|
1
|
require_once( dirname(__FILE__) . ‘/colortag-widget.php’ );
|
然后添加前端展示样式,在你的主题css样式添加如下代码:
1
2
3
4
5
6
7
8
9
10
11
12
13
14
15
16
17
18
19
20
21
22
23
24
25
26
27
28
29
30
31
32
33
34
35
36
37
38
39
40
41
42
43
44
45
|
.colortags {
font-size: 0;
overflow: hidden;
margin-right: -8px;
padding: 20px;
}
.colortags a {
padding: 6px 10px 6px;
font-size: 13px!important;
display: block;
white-space: nowrap;
text-overflow: ellipsis;
overflow: hidden;
float: left;
margin: 0 8px 8px 0;
position: relative;
color:#FFF;
}
.colortags a:nth-child(8n-7) {
background-color: #8A9B0F;
}
.colortags a:nth-child(8n-6) {
background-color: #EB6841 ;
}
.colortags a:nth-child(8n-5) {
background-color: #3FB8AF;
}
.colortags a:nth-child(8n-4) {
background-color: #FE4365;
}
.colortags a:nth-child(8n-3) {
background-color: #FC9D9A;
}
.colortags a:nth-child(8n-2) {
background-color: #EDC951;
}
.colortags a:nth-child(8n-1) {
background-color: #C8C8A9;
}
.colortags a:nth-child(8n) {
background-color: #83AF9B;
}
.colortags a:first-child {
background-color: #036564;
}
|
当然具体前端展示样式可能有所出入,需要自行调整一下。
最后再到WordPress管理后台中,将你的彩色标签云添加到你想要的的位置就可以了。


还没有任何评论,赶紧来占个楼吧!