WordPress主题后台教程-设置选项类文件使用方法
上一篇教程中贴出了一个可以很方便添加后台设置选项的类文件,下面是该类文件的使用方法: 一、载入类文件 在你的主…
上一篇教程中贴出了一个可以很方便添加后台设置选项的类文件,下面是该类文件的使用方法:
一、载入类文件
在你的主题functions.php文件中使用include_once载入该文件,比如上节教程的类存放于主题文件夹下的option-class.php文件中:
- include_once(‘option-class.php’);
二、检查js文件
如果你需要使用上传图片的选项,请根据上节教程类代码中 enqueue_head函数里面加载的js文件路径,准备好一个js文件,js代码在上节教程中也贴出了。
三、新建配置文件
例如在主题文件夹中新建一耳光option.php文件,也使用include_once载入该文件:
- include_once(‘option.php’);
设置选项的配置代码都添加在该文件中。
四、配置选项
用编辑器打开上面添加的option.php,添加配置代码,示例代码如下:
注意
- 对于数组类型、复选框、编辑器,配置中的id有要求。
- 复选框和数组保存的数据为数组
- <?php
- $pageinfo = array(‘full_name’ => ‘阿树工作室网站设置’, ‘optionname’=>’ashu’, ‘child’=>false, ‘filename’ => basename(__FILE__));
- $options = array();
- $options[] = array( “type” => “open”);
- $options[] = array(
- “name”=>“阿树工作室-标题”,
- “desc”=>“这是一个设置页面示范”,
- “type” => “title”);
- $options[] = array(
- “name”=>“文本框”,
- “id”=>“_ashu_text”,
- “std”=>“阿树工作室文本输入框”,
- “desc”=>“阿树工作室版权所有”,
- “size”=>“60”,
- “type”=>“text”
- );
- $options[] = array(
- “name”=>“文本域”,
- “id”=>“_ashu_textarea”,
- “std”=>“阿树工作室文本域”,
- “desc”=>“阿树工作室版权所有”,
- “size”=>“60”,
- “type”=>“textarea”
- );
- $options[] = array(
- “name” => “图片上传”,
- “desc” => “请上传一个图片或填写一个图片地址”,
- “std”=>“”,
- “id” => “_ashu_logo”,
- “type” => “upload”);
- $options[] = array( “name” => “单选框”,
- “desc” => “请选择”,
- “id” => “_ashu_radio”,
- “type” => “radio”,
- “buttons” => array(‘Yes’,’No’),
- “std” => 1);
- $options[] = array( “name” => “复选框”,
- “desc” => “请选择”,
- “id” => “checkbox_ashu”, //id必须以checkbox_开头
- “std” => 1,
- “buttons” => array(‘汽车’,’自行车’,’三轮车’,’公交车’),
- “type” => “checkbox”);
- $options[] = array( “name” => “页面下拉框”,
- “desc” => “请选择一个页面”,
- “id” => “_ashu_page_select”,
- “type” => “dropdown”,
- “subtype” => ‘page’
- );
- $options[] = array( “name” => “分类下拉框”,
- “desc” => “请选择大杂烩页面”,
- “id” => “_ashu_cate_select”,
- “type” => “dropdown”,
- “subtype” => ‘cat’
- );
- $options[] = array( “name” => “分类下拉框”,
- “desc” => “请选择大杂烩页面”,
- “id” => “_ashu_side_select”,
- “type” => “dropdown”,
- “subtype” => ‘sidebar’
- );
- $options[] = array( “name” => “下拉框”,
- “desc” => “请选择”,
- “id” => “_ashu_select”,
- “type” => “dropdown”,
- “subtype” => array(
- ‘苹果’=>’apple’,
- ‘香蕉’=>’banana’,
- ‘桔子’=>’orange’
- )
- );
- $options[] = array(
- “name” => “编辑器”,
- “desc” => “”,
- “id” => “tinymce_ashu”, //id必须以 tinymce_开头
- “std” => “”,
- “type” => “tinymce”
- );
- $options[] = array(
- “name” => “数组信息”,
- “desc” => “请输入一组id,以英文分号隔开,例如 1,2,3”,
- “id” => “numbers_ashu”, //id必须以 numbers_开头
- “size”=>60,
- “std” => “”,
- “type” => “numbers_array”
- );
- $options[] = array( “type” => “close”);
- $options_page = new ashu_option_class($options, $pageinfo);
- ?>
最后面不要忘记类的实例化。
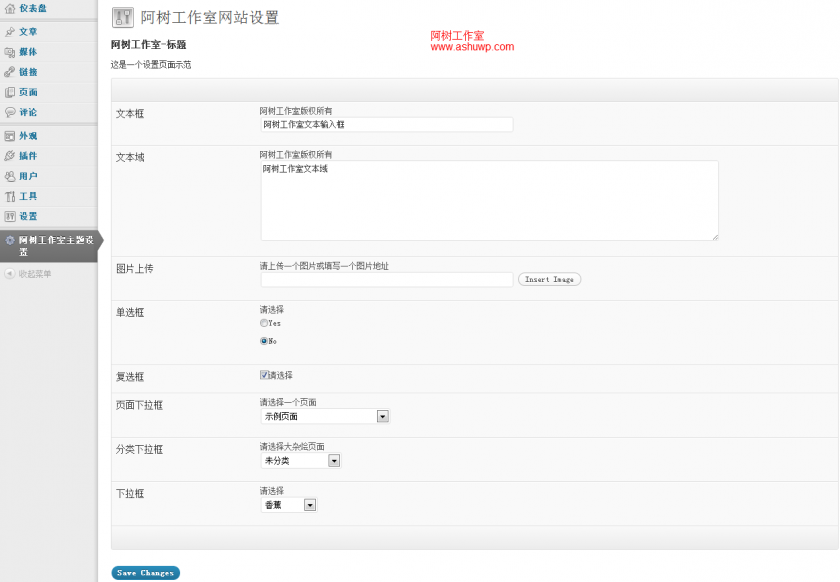
效果图:
前台调用(重要):
注意,我们在类文件中声明了一个全局变量: $ashu_option; 如果你的设置选项很多,如果前台每次使用一个设置选项都调用一次get_option函数,这是不明智的选择,建议使用一个全局变量。而且我们所有的选项值都在一个选项组里,只需要执行一次get_option函数即获取了所有设置数据,所以将它保存在一个全局变量中。
范例:对于上面的示例设置选项,我们在首页添加代码将设置数据打印出来:
- <?php
- global $ashu_option;
- var_dump($ashu_option);
- ?>
输出结果:
- array
- ‘ashu’ =>
- array
- ‘_ashu_text’ => string ‘阿树工作室文本输入框修改’ (length=36)
- ‘_ashu_textarea’ => string ‘阿树工作室文本域修改’ (length=30)
- ‘_ashu_logo’ => string ‘http://localhost/newtheme/wp-content/uploads/2012/08/1960_19591-360×200.jpg’ (length=75)
- ‘_ashu_radio’ => string ‘2’ (length=1)
- ‘_ashu_checkbox’ => string ‘true’ (length=4)
- ‘_ashu_page_select’ => string ‘2’ (length=1)
- ‘_ashu_cate_select’ => string ‘1’ (length=1)
- ‘_ashu_select’ => string ‘banana’ (length=6)
- ‘save_my_options’ => string ‘1’ (length=1)
- ‘Submit’ => string ‘Save Changes’ (length=12)
到了这里,如何调用其中的数据,就不赘述了
类别:WordPress开发、
本文收集自互联网,转载请注明来源。
如有侵权,请联系 wper_net@163.com 删除。

还没有任何评论,赶紧来占个楼吧!